Walk Lightly on this PLANET and yet leave such a FOOTPRINT that cannot be erased for thousands of Years..!!!
Visit Codstech for Cyber Security related Posts !

Visitors

Showing posts with label PHP WAMP Server. Show all posts

Tuesday, February 11, 2014

Connecting database (Live example)

Refer login form  and PHP-Database Connection
==================================================
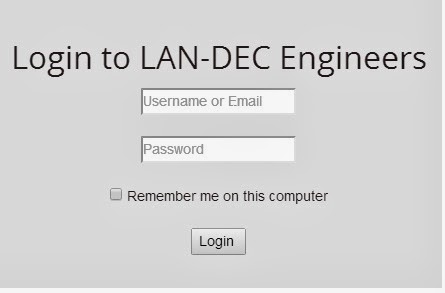
Check www.landecsurvey.com  , and click Login, then we can see the login form.


Open a file in text editor and write code .I am using "Dream Weaver" , and save the file with .php extension .

There are two parts for this code.
  1. Login Button codes
  2. Giving actions to buttons

Login Button codes are a follow :


<!doctype html>
<html>

<head>
  </head>
<body>

  <?php
 
 include("include/db.php"); 
 
  ?>         
           
<br><br><br><br><br>


<div class="login">
    <center>  <h1>Login to LAN-DEC Engineers</h1>
               
<!-- NO : 1 /*=======Login Button codes==========*/-->        
       
                <form class="" name="login"  method="post" onSubmit="return validateForm1()">
                                                                               
                <br>       
                                                                                                               
                             <p>   <input type="text" name="uname" value="" placeholder="Username or Email"></p>
                               
                                                                                <br>                     
                                                                                                <p>        <input type="password" name="pword" value="" placeholder="Password"> </p>
                                                                                                               
                                                                                                                <br>

                                                                                                                <p class="remember_me">
          <label>
            <input type="checkbox" name="remember_me" id="remember_me">
            Remember me on this computer
          </label>
        </p>
 <p class="submit"><br>
                                                                                                                <input type="submit"  name="Submit" value="Login ">
                                                                                                  </p>


                                                                                </form></div></center>

    </body>
    </html>

Note that , what i the content of the file  include("include/db.php");   will follow on next section.
(code for "Remember me on this computer"
In the same file

=============
Back to Creating a PHP web site - Starting from scratch


Continue.................

Saturday, November 2, 2013

PHP-4 : Login form

Refer the below given sessions , before doing any PHP program.     
PHP Introduction - And some useful points in Programming
PHP : WAMP Server
PHP-Database Connection

  • Open wamp-->phpMyAdmin to create database .
  • Open Dreamweaver to write php code , with in the body tag .That is ,
    <body>
    .......................} php code 
    </body> .
    and save it (as .php) under the www directory of wamp server
  • Then click wamp-->localhost to view it in the browser.
Back to HOME & PHP 

========================================================================
The login form here given is the form only for saving the user name and password to the database.

  • Open wamp-->phpMyAdmin to create database (Refer PHP : WAMP Server to know in detail)


Refer How to create a Database in WAMP Server ??
  • In dreamweaver , we are writing the code as ; 
A : Code for the form

B : Attaching code with the database..
 Now we are creating the database connection through code.


Total code is A+B is ;

<!DOCTYPE html PUBLIC "-//W3C//DTD XHTML 1.0 Transitional//EN" "http://www.w3.org/TR/xhtml1/DTD/xhtml1-transitional.dtd">
<html xmlns="http://www.w3.org/1999/xhtml">
<head>
<meta http-equiv="Content-Type" content="text/html; charset=utf-8" />
<title>Untitled Document</title>
</head>

<body>

<?php
if(isset($_POST["bt"]))
{
$connect=mysql_connect("localhost","root","")or
die("could not connect to the server");
mysql_select_db("student",$connect) or
die("could not connect to student database");
//php comment
$n=$_POST['name'];
$p=$_POST['pass'];

$q="insert into adddata values('$n','$p')";
$re=mysql_query($q,$connect);
if($re)
{
echo "Succesfully added a data";
}else
{
echo "Data could not be added";
}
die("<br><a href='home.php'>back to home</a>");
}
?>

<form action="<?php echo $_SERVER['PHP_SELF'];?>" METHOD="post">
<TABLE border=0>
<tr>
<td>Enter name</td>
<td><input type='text' name ='name'/></td>
</tr>
<tr>
<td>Password</td>
<td><input type='password' name ='pass'/></td>
</tr>
<tr>
<td colspan="2" align="center"> <input type="submit" value="Enter" name="bt"/></td>
</tr>
</TABLE>
</form>

</body>
</html>

(Codes in brown color is the second part(B) of the code and blue is that of A) .

Then , save it as .php

C : Output : 
Save the file with the extension .php , and open if from WAMP SERVER , 
(click wamp-->localhost to view it in the browser.)


Again , 


To view the database , in which the values are stored, click WAMP-->phpMyAdmin, 
Then , Select the database and table .

Note :

POST & GET are used to collect form-data.
Both GET and POST create an array , which holds key ( names of the form controls ) OR value pairs ( input data from the user) .
Information sent from a form with the GET method is visible to everyone , through URL.
So , GET should NEVER be used for sending passwords or other sensitive information!
Information sent from a form with the POST method is invisible to others , because the variables are not displayed in the URL, it is not possible to bookmark the page.


In the above code the following is the simple html code :
===========================
<!DOCTYPE HTML>
<html> 
<body>

<form action="....." method="post">
Name: <input type="text" name="name"><br>
E-mail: <input type="text" name="email"><br>
<input type="submit">
</form>

</body>
</html>
===========================

This is the simple code, to create the form.
When the user fills out the form with username and password , and clicks the submit button, the form data is sent for processing to a PHP server.

PHP-Database connection


Read Introduction to DBMS / RDBMS before proceeding..

Refer PHP-WAMP Sever
Refer PHP - Introduction before reading this..
===============================================
1 : Writing PHP code 

Check php-login form also.

We are writing PHP code in Dreamweaver.
To do so , open  Dreamweaver.

Select PHP from the menu , and click CREATE.


Now we can see the code window as;

We are going to write the code with in the body tag That is , <body>..............</body> .


This is the first step in writing code

  • <Form action="<?php echo $_SERVER['PHP_SELF];?>" METHOD="post"> .

which implies that the action taken place when clicking the button ENTER .

  • SERVER['PHP_SELF] means after clicking the action taken place in the same pags itself(not redirecting into another page). 
  • METHOD="post" ,which means the method used here is POST. There are two types of method we can use , POST and GET . In the example , if I enter Priyada as user name and click the button , then in the url of the page , we can see the entered name also if we choose the method GET . Otherwise not.
  • Input type = TEXT and PASSWORD , for both the user name and password field.
  • Other codes are HTML .We are using tr and td for table-row and table-column properties.


2 : How and where to save this file ?

Save this file with the extension .php (dot php) , save under the directory www , in which the WAMP server is located. It's better to create a folder (here , I created studyphp) under www , then save all the files under that .And the file name I gave is home.php .
You can select the www directory from the location in which the wamp server is located , or from  the menu as given..

3 : How to view the output of the created code ??

Click the LOCALHOST from the above picture , and you can see all the folders under www directory , as ,


Open the folder we created under www directory.(here it is studyphp).
Then we can see all the files created with a heading Index of /Studyphp .
Click the saved file ( home.php is the name I used to save the code)

The output you can see then , 


4: Attaching code with the database..
 Now we are creating the database connection through code.


Again , save the file , and open if from WAMP SERVER , 
In the code given above, note that;
  • The  $ symbol is used to connect to the database. Also , for declaring a variable $ is uesd.
  • bt is the name of the button named ENTER .
  • This is the code used to connect to the database.
<body>
<?php
if(isset($_POST["bt"]))
{
$connect=mysql_connect("localhost","root","")or
die("could not connect to the server");
mysql_select_db("student",$connect) or
die("could not connect to student database");

Here, localhost is used to view result (instead if mysql is in any other computer , which is connected through network , instead of localhost , we have to give the name of that computer .

isset($_POST["bt"] will work , only if we click the button (ENTER)

If no connection is established , then the die statement will wrok.(If we dont give this statement , evenif the connection is not established , the page will remain as blank.).

  • We are declaring 3 variables as $n (for username) ,$p(fpr password) and $re(for result).
When we give $n=$_POST['name'] , the value in the textbox "name" will be transferred to the variable "n" . Note that "name" and "pass" are the names of the text field and password field we given.
  • href='home.php'>back to home 
href is used to navingating to other area/page etc.

5 : Output : 

Click WAMP-->Localhost


Enter user name and password (Follow the step 2 and 3 , to get the output screen again), then click ENTER . Then that value will be saved to the database.

While clicking ENTER , we can see .


To view the database , in which the values are stored, click WAMP-->phpMyAdmin, 
Then , Select the database and table , 


Now we are going to do some database related programs..
Refer PHP-WAMP Sever before going through this section..
Refer PHP - Introduction before reading this..
============================ =========================================
Back to HOME & PHP 

PHP : WAMP Server

Refer PHP - Introduction before reading this..
Click PHP-Database Connection .
====================================
If we type a web site address, the corresponding information is sent to us by some Servers.

  • To view PHP-sites in our localhost , use WAMP Server .
  • If it is a PHP site, APPACHE Server send the corresponding Information.
  • Wamp Server is a platform which contains PHP, APPACHE and MySql .
  • Wamp is for WINDOWS and Lamp is for LINUX.
Install WAMP Server first from HERE.


After installing , double click on wamp server.
Then the pink color turns Green , in the TASK BAR, indicates that WAMP server is in running mode..as ; 


Right click on the GREEN coloured Wamp server , then we can see a pop-up menu as; 


When we click LOCALHOST , we can see, 


When we click MySQL , we can see a window , where we can type SQL Commands there..


Click phpMyAdmin ,then.


You can see , the created database on the left side (world,test...etc) .
Some options are also there like DATABASE, SQL,STATUS..etc.

How to create a Database in WAMP Server ??


  1. Click PhpMyAdmin (as given above)
  2. From the screen , click DATABASE. 

3.  Give a database name and click CREATE , as given above.
     You can see that the database with name MYDATABASE has been created.You can see it in the list.
4.  Click MYDATABASE from the list , then you can see , 


           Give a table name (here , I gave login as table name , and number of columns as 2.Then click GO .
5.       Then we can see another screen as ;

     
     Give username , type=varchar, length=25 , and that of password also. Then click SAVE.
6.   Then we can see another screen as ,


       (The given screen is different , with the database name as student and table name as adddata . Instead        we can see MYDATABASE and LOGIN ) .
7.    Now click INSERT . Then we can see


         We can type the contents of the table here. 
         But here, we are going to enter the details through database.


Back to HOME & PHP