Walk Lightly on this PLANET and yet leave such a FOOTPRINT that cannot be erased for thousands of Years..!!!
Visit Codstech for Cyber Security related Posts !

Visitors

Wednesday, August 31, 2011

C-39 : Example of Escape Sequence (\n)

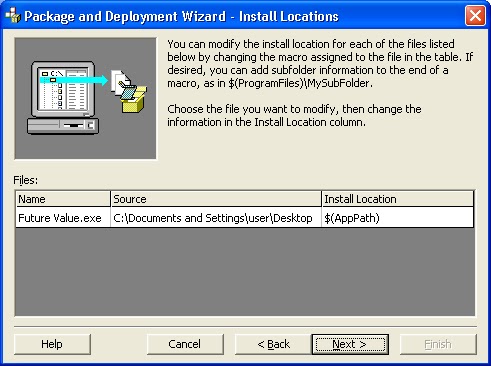
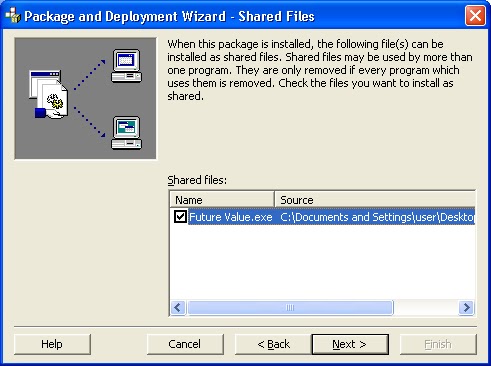
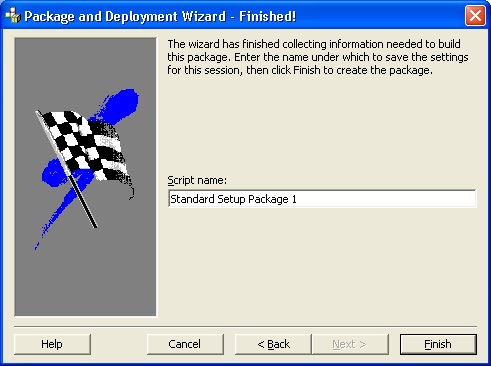
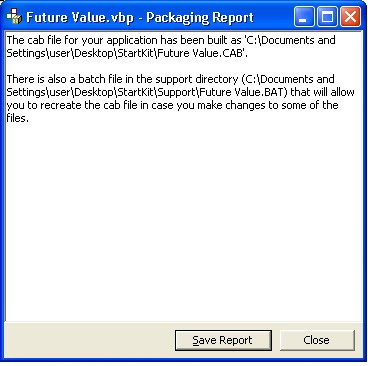
\n is the example of  Escape Sequence.
It's used to print the newline character.
Note that ,\n doesn't appear in the output.
Place \n wherever you want to insert a new line in the output.

See the examples below :
(Eg:-1) :

#include<stdio.h>
#include<conio.h>
void main()
{
            clrscr();
            printf("This\nString\nwill\nbe\nprinted\nin\n8\nlines.\n");
            getch();
}

Output:
This
String
will
be
printed
in
8
lines
===========================================================================
(Eg :-2) :
#include<stdio.h>
#include<conio.h>
main()
            {
            clrscr();
            printf("This is the First Line of Output.");
            printf("But is this the Second\nline of Output?");
            getch();
            }

Output:
This is the First Line of Output. But is this the Second
line of Output?


===========================================================================
(Eg :-3) : 


#include<stdio.h>
#include<conio.h>
main()
            {
            clrscr();
            printf("In how many lines will the output\nof this program be printed?");
            getch();
            }


Output:
In how many lines will the output
of this program be printed?
===========================================================================
(Eg:-4) :


What will be the output of the program ?

#include<stdio.h>
#include<conio.h>
main()
      {
      clrscr();
      printf("\"\\n\", the teacher said,\"is used to  ");
      printf("insert a new line in a C string.\"");
      printf("\n\" I C,I C\",said the blind student.\n");
      getch();
      return 0;
      }

Output:


" \n", the teacher said, "is used to  insert a new line in a C string".
"I C,I C", said the blind student.

(An important point to remember :  ""(Double Quote) character is not an Escape Sequence ).
.


=========================================================================
Back to Home   &  C

C-38: Example for Nested IF

Example to demonstrate Nested IF :

Refer Find largest from given numbers also.


#include<stdio.h>
#include<conio.h>
void main()
{
clrscr();

            printf("First Section\n");
            {
                 printf("Second Section\n");
                 {
                        printf("Third section\n");
                        {
                                    printf("Fourth Section\n");
                        }
                 }
            }
            getch();
}


Output:

First Section
Second Section
Third Section
Fourth Section
=========================================================================
Back to Home   &  C

C-37 : My first C Program

My first C Program ; To display a message


#include<stdio.h>
#include<conio.h>
void main()
            {
            clrscr();
            printf("My first Program!! \n");
            getch();
            }


Output :

My first Program!!


Refer To display a message also.

Note :
While using code block ....See the input code below :
(use file --> new empty file )
 

(No need to  use "clrscr" if u are using code block like software)
=========================================================================
Back to Home   &  C

Friday, August 19, 2011

VB-110 : To create an Installing/Set up Kit

Creating an Installing kit or Set up Kit means , To Prepare a Kit which is ready for installing in any computer..Just like a Software.


We are using  Calculate future value of an investment  Program as an Installing Kit
  • Select , Add-Ins --> Add-In Manager 
Select  package and Deployment Wizard , then Click OK 
Then we can see that ,


Click Package , then we can see a Wizard as seen below :

Click , Browse if you are already created or saved this project as an Executable File .
Otherwise, click Compile to make an EXE File.
(Note that , if you are not saved the project , then a box will appear as :

Click Yes to complete Compiling..and you will directed to another window as shown :

In the above given picture , follow the given steps.

  • Select Standard Setup Package and click Next . 
  • Then another window will appear and select the folder for creating the Setup Program.


Click Next . Then we can see ;


(Click Add , if we want to add any other particular file for creating Setup Program).
Otherwise click Next

Select Single Cab , and Click Next

Give the Installation Title (Here , we are installing interest calculation)
Click Next

Click Next

Click Next

Click Next


Click Finish
Click Save Report
And then Save it as a TXT File , Click Close


Output :

Select the place you saved or created the file.
Open it. Then we can see,


Note , Setup.exe is formed.
Now , it is ready for installing in any computer..Just like a Software.
=========================================================================

 Errors :

If found any errors while running your VB program, or want to put your comment about any  program , please click Comment section , to post

      • ====================================================================
        Back to Home   &  VB ==========================================================

Monday, August 15, 2011

VB-109 : To create Reports using Data Reports

This program is connected with the below given 2 programs also...
So , You must refer them while doing the third Program.
They are ;
  1. Program using ADO Data Control
  2. How to see Data in Grid
Come to MDI Form
You can use previous MDI Form from the above given 2 Program , or to create a new one.

(A) Program  Design :


MDI Form
Project-->Add MDI
Then select Tools--> Menu Editor . Create a Menu as per shown below:
(Create a menu with Report and Exit as the Main menus)

The created Menu Bar in MDI form will look like this :


Designing Data Environment :
We are creating Reports , using Data Reports.
Befor that , we have to design Data Environment.


Select , Project--> Add Data Environment.
We will get a Screen named "DataEnvironment1" , like this :


Right Click Connection1 to get it's Properties.
We will lead to the Data Link Property Page , and select Microsoft Jet 4.0OLE DB Provider , and Click Next.


Click Next and select the Database Name we created (Here, Student) .


Click Test Connection to check whether the connection is correct.Then click OK , to return to the "DataEnvironment1" window.
============================================
Now , we have to create a connector between Data and Report.
To do this, right click on Connection1 of the Screen named "DataEnvironment1".
Click Add Command . Then we will get ;

Again  , Right Click on Command1 to get its Properties.
Now , we will get :

Select , 
DataBase Object - Table
Object Name-Student
Click OK
Then we can see;


Now , we can see Plus (+) symbol on the left side of Command1 .
Expand that + (Plus).
Then we can see all the created fields as :


Now , Project--> Add Data Report
Then we can see a window as :


Note the 5 sections in the Data Report window.
The next step is to change the Property of DataReport Window , as ;
DataSource    - DataEnvironment
DataMember  - Command1
(Refer this figure)


===================================
Next step is to Bring necessary fields from DataEnvironment1 to DataReport1.As given below:


Note that , 5 sections are there in the DataReport1 window . 
We are bringing the fields from DataEnvironment1to Detail (Section1) , of DataReport1 window .


Here , I am bringing Name , Admission Number , Course and DOB to Section1


Arranging Fields in DataReport :


Drag details from Section1 to Section4 (That is , from Detail to Report Header)
And , arrange the fields as given below :


From the Caption Property , we can change the fields , like Capital letter etc. Here is how it did.
Select Name - Change the Caption as NAME ..
And , notice all the changed fields..in the Report Header.

Note the Tool Box in the left side.

2 Tabs are there : 

  1. General
  2. DataReport
From here, Take RPTLabel and place to Report Header of DataReport1

Its Caption is Student Report 


Now , come to MDI Form: 
(Note that , you can see two options Forms and Designers in the Project1 menu.Select the option you want to take) , as given below:


Code for MDI Form :
Select Data from Report Menu of the MDI Form , to enter Code.

Private Sub mnudata_Click()
DataReport1.Show
End Sub
Private Sub mnudetails_Click()
Form3.Show
End Sub
Private Sub mnuexit_Click()
End
End Sub

======================================================================
Run the Project :
We can see MDI Form as Main Menu .


  • Click -: Report -->Details . Then we can see;


  • Click -: Report -->Details . Then we can see;


=========================================================================

 Errors :

If found any errors while running your VB program, or want to put your comment about any  program , please click Comment section , to post

      • ====================================================================
        Back to Home   &  VB ==========================================================

Sunday, August 14, 2011

VB-108 : How to see Data in Grid

This program is connected with the below given 2 programs also...
So , You must refer them while doing the third Program.
They are ;

  1. To create Reports using Data Reports
  2.  Program using ADO Data Control

==========================================================
Here , we are going to view Data in Grid Control
 Add a Form and a MDI Form for this Project.
  • Form
  • MDI Form 
=========================================================================
Details about adding Forms : 


(If we want , we can add the 2 Forms  ,as we did in Program using ADO Data Control ,then we can add/modify the data).


Here , I am doing the method to view the fields in Grid Form.
 If you are placing Form1 & Form2 also , then add the new Form as Form3 and   place a Data Grid Control.

=========================================================================
(A) Program  Design :


Form
(Add One Data Grid Control ,One ADO Data Control , and one Command Button with Caption OK
Select Project-->Components--> Microsoft DataGrid Control 6.0 ,  to place a Data Grid Control


MDI Form
Project-->Add MDI
Then select Tools--> Menu Editor . Create a Menu as per shown below:
 (Create a menu with Student , Report and Exit as the Main menus)


The created Menu Bar in MDI form will look like this :


--------------------------------------------------------------------------------------------

(B) To Design a Database for this Program :

Now we are going to create a Database as per the above given details :as we did in Program using ADO Data Control 

We are creating this in MS-Access.
(You can Refer Linking to Database also to know How to create a Database in Access)

  • Open MS Access
  • Select Blank Database , give a name and click Create(Here , we are giving a file name -Student)
  • Create table in Design view
  • Give Details 
It will look like this :


Then File --> Save ( Note that , the Table Name is Student)
--------------------------------------------------------------------------------------------
(C) Now,we are going to connect this Database & VB


(1) Connecting ADODC of Form:

  • Select  Form
  • Right Click on ADODC to get its Properties
(Refer Creating Database within VB Platform and note Point Number (4) , "How to connect ADO DataControl with Database" , to know more about ADODC Properties)
  • Now , we will get a Property Page , select Use Connection String and  Click Build 
  • And we will lead to Data Link Property pages , and select Microsoft Jet 4.0 OLEDB Providerand Click Next
  • Select the created Database Name (Here, we created Student) , and Click Test Connection to know whether the connection is right.Click OK
  • Again , back to Property Page , select Record Sourse , and select 2-adCmdTable and select table (Student)
  • Apply , OK
======================

(2) Connecting DataGrid of Form:


Select Data Source Property to Adodc1


======================
(C) Now,we are going to write Code :


(1) Code for MDI Form :

Private Sub mnudetails_Click()
Form3.Show
End Sub
Private Sub mnuexit_Click()
End
End Sub


(2) Code for Form :


Private Sub Command1_Click()
Unload Form3
End Sub


(D) Run the Project :

Select Details (From MDI Form ) then we can see the Datas in Grid Form as;


(E) Errors :

If found any errors while running your VB program, or want to put your comment about any  program , please click Comment section , to post

      • ====================================================================
        Back to Home   &  VB ===========================================================