Refer PHP Introduction & SQL - Quick reference
Balance chapter from
In the previous chapters , we came to know that , some fields can't edit within the page.
In Editing other pages of a website from a Template , we edited almost all the pages .
Now , we are designing with CSS etc (refer PHP Introduction ).
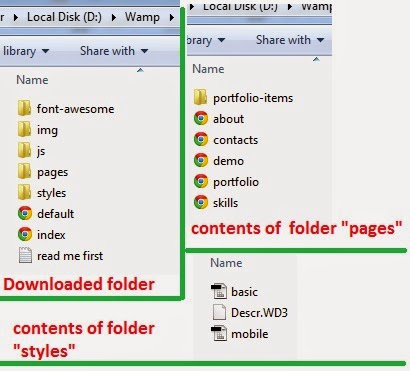
Before starting , open the downloaded folder once again and click the folder named "pages".
There you can see that there are other HTML files like : about.html , contacts.html , demo.html , portfolio.html and skills.html . See below :
That is , there is the title "About us" and there is an "icon" for the user.
When we click "about us" , the corresponding code will display below the design.
Code part in index.html itself also attached above .
press ALT then click on "about us" (alt click) of index.html. It will display a box which contains the exact line of code and name of the file which is associated with "about us" in index.html .
We know that , there is a folder named "styles" in the downloaded template , which contains two CSS files such as "basic" and "mobile" .
This "basic.css" is the code which links between index.html and "about.html" .
One more important point :
When we click any of the code in Picture - 3 , it will redirect us to the corresponding CSS file .So editing will be easy . See below :
This means , now you get the design view above , and the corresponding CSS code view in below ( Instead of Picture - 2) . In index.html , normally there is the corresponding code below the design . This method is more easy to find out the destination file .
That is , When we click "about us" , some text part is displaying on the right side.
When we click on that text area, corresponding code will display below the design part .That will also attached in the above picture. .
Means , these text area (picture-4) also connected to another file which is not directly editable from index.html.To find out that destination file , we can use "code navigator" (alt click).
press ALT then click on that text part of picture - 4 . It will display a box which contains the exact line of code and name of the file which is associated with index.html .See below :
Combined code as given ,
Note that , the difference in the basic.css file for both text part.
At first click the "About us" menu.Refer picture - 1 .
We already changed "About" to "About us".Now closely observe each code.
You can see that href="pages/about.html which means the link from this page(index.html) goes to about.html.
Where is that page ? It is in the folder named "pages". (href is nothing but a code used to give link).
In the downloaded folder , when we open the folder named "pages" , you can see the pages as in picture - 1 .
From index.html , the link goes to about.html page .Now open this page in dreamweaver .
You can see the text that ,
You can see some simple text here .
But , when you open index.html and clicking the term "About us" , it shows like Picture - 4.
The link "About us" from index.html , connected to the page about.html . And you can see that when the text comes to inde.html , it has some modification. Here comes the importance of Cascadng Style Sheet or simply CSS.refer PHP Introduction to get a small idea about CSS.
That is , When we clicked the folder r named "styles" in the downloaded template ,you can see 2 files as in picture - 1 .
(This is a bit lengthy one , a beginner can't follow
them easily.I will describe them later).
Balance chapter from
- PHP : Downloading a template and editing
- Editing a PHP Template using Dreamweaver
- Editing TITLE of a template
- Editing other pages of a website from a Template
- Introduction to Advanced Designing
PART - 6 " ABOUT "
Here , we are explain how to design an about page , in detail.
In Editing other pages of a website from a Template , we edited almost all the pages .
Now , we are designing with CSS etc (refer PHP Introduction ).
Before starting , open the downloaded folder once again and click the folder named "pages".
There you can see that there are other HTML files like : about.html , contacts.html , demo.html , portfolio.html and skills.html . See below :
 |
| PICTURE - 1 : Downloaded folder of Template |
It's only for your understanding.
Now , before start designing , keep these points in mind.
Open index.html in Dreamweaver , and have a look at "about us" (This "about us" in index.html is connected to "about.html" pages See the pages in above picture).
POINT NO : 1
 |
| Picture - 2 : About us have 2 part : icon-user & title |
When we click "about us" , the corresponding code will display below the design.
Code part in index.html itself also attached above .
POINT NO : 2
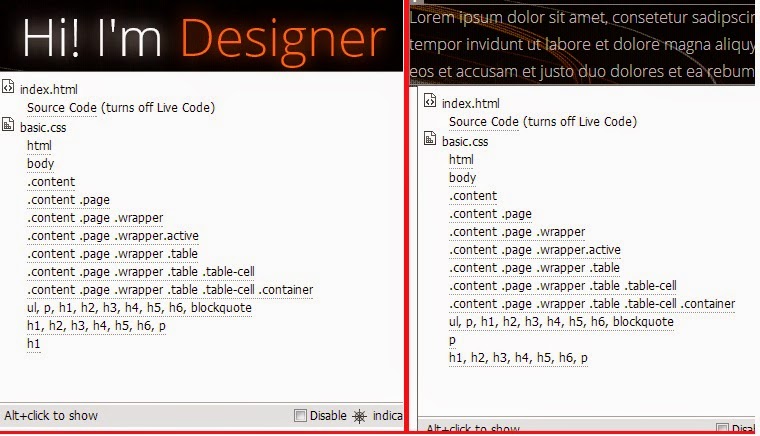
The same also connected to another file which is not directly editable from index.html.To find out that destination file , we can use "code navigator" (alt click).press ALT then click on "about us" (alt click) of index.html. It will display a box which contains the exact line of code and name of the file which is associated with "about us" in index.html .
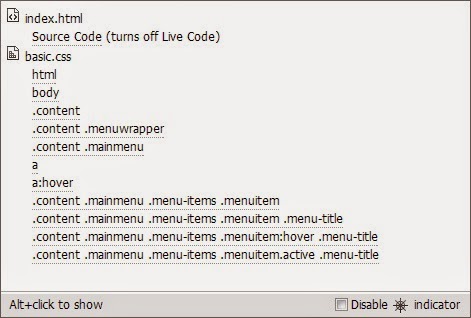 |
| Picture - 3 : ALT CLICK on about us gives the destination file basic.css |
This "basic.css" is the code which links between index.html and "about.html" .
One more important point :
When we click any of the code in Picture - 3 , it will redirect us to the corresponding CSS file .So editing will be easy . See below :
 |
| Picture - 3(1) .Clicking any of the code in picture -3 will redirect you to the given picture . |
POINT NO : 3
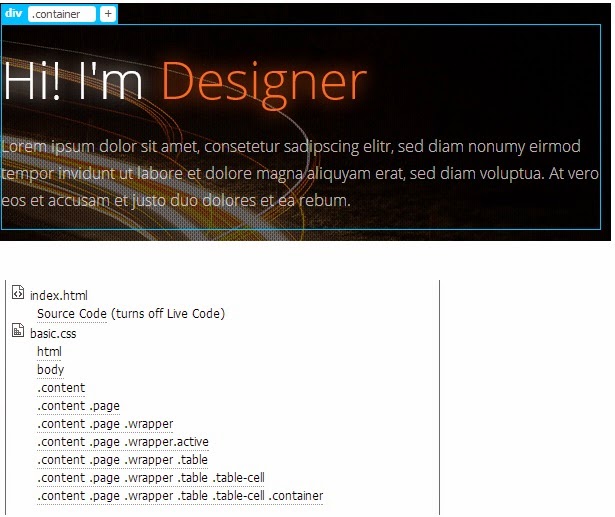
Now , again from index.html , click "about us" , when we click the term "About us" , it shows as ,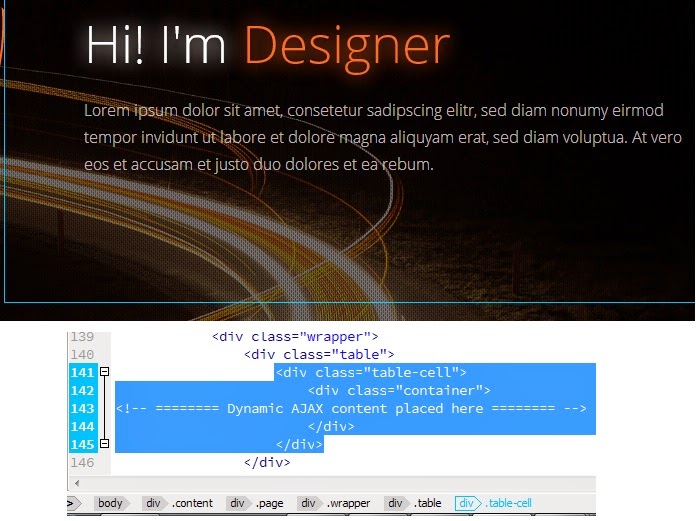 |
| Picture - 4 : when we click the term "About us", the text will appear on the right side of index.html . |
When we click on that text area, corresponding code will display below the design part .That will also attached in the above picture. .
POINT NO : 4
Now again , as we did in POINT NO : 2 , ALT CLICK on the text part to get it's destination file.Means , these text area (picture-4) also connected to another file which is not directly editable from index.html.To find out that destination file , we can use "code navigator" (alt click).
press ALT then click on that text part of picture - 4 . It will display a box which contains the exact line of code and name of the file which is associated with index.html .See below :
 |
| Picture - 5 :ALT CLICK on the text part to get it's destination file "basic.css" |
 |
| Picture - 5(1) : Alt click both text together , to get this CSS file |
Note that , the difference in the basic.css file for both text part.
Now , we are going to the coding part of the above points
At first click the "About us" menu.Refer picture - 1 .
We already changed "About" to "About us".Now closely observe each code.
You can see that href="pages/about.html which means the link from this page(index.html) goes to about.html.
Where is that page ? It is in the folder named "pages". (href is nothing but a code used to give link).
<a href="pages/about.html" class="menuitem">
<i class="icon-user"></i>
<div class="menu-title">About us</div>
</a>
|
In the downloaded folder , when we open the folder named "pages" , you can see the pages as in picture - 1 .
From index.html , the link goes to about.html page .Now open this page in dreamweaver .
You can see the text that ,
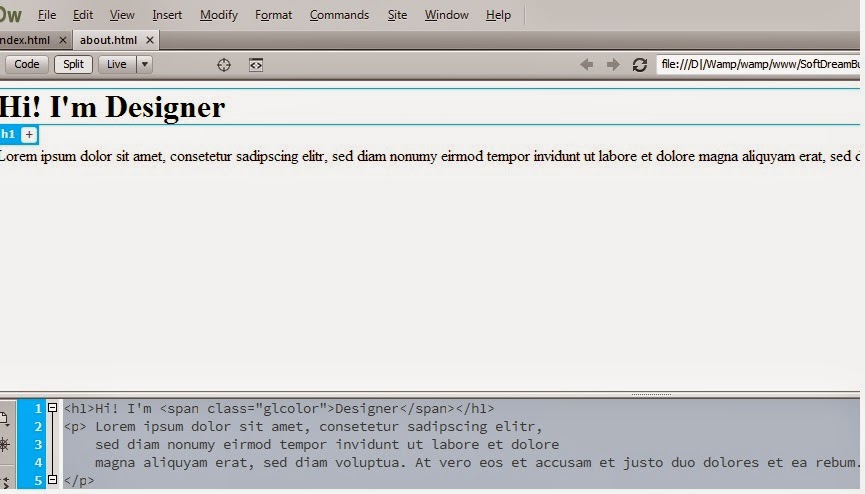 |
| Picture - 6 : about.html ( linked from index.html) |
But , when you open index.html and clicking the term "About us" , it shows like Picture - 4.
The link "About us" from index.html , connected to the page about.html . And you can see that when the text comes to inde.html , it has some modification. Here comes the importance of Cascadng Style Sheet or simply CSS.refer PHP Introduction to get a small idea about CSS.
That is , When we clicked the folder r named "styles" in the downloaded template ,you can see 2 files as in picture - 1 .
- basic
- mobile
Both are CSS files. All the text style,size, color etc are giving in this code part.
Then linking this to index.html
them easily.I will describe them later).
POINT NO : 5
How to find out the code connected from index .html to CSS files ?
Open index.html .
Open basic.css .
You know already that , in HTML (Refer HTML - An Introduction) after html and body part , coding will start .
Refer Picture - 3 and 3(1) & Point no - 2 .
You can see that ,
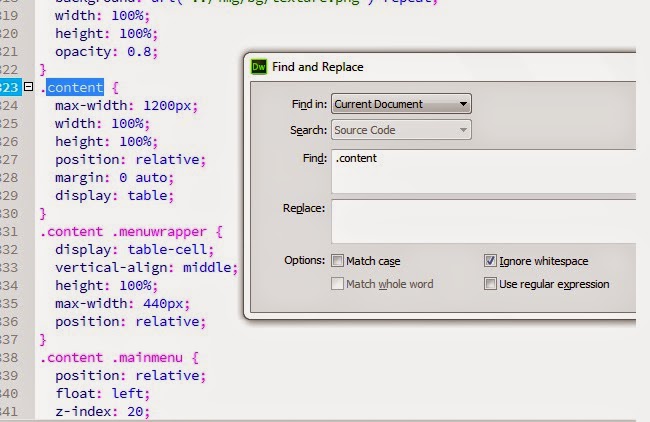
At first ,from basic.css , use controlF (find) to find out this code.
When we use FIND command to search the word .content , it displays all the word starting with .content.
All the pink colored one is the CSS code for "about us " in index.html.
A little effort needed to study this , but here , I am giving the details related to index.html file only.
Let's have a look at each one of this in detail.
Like this , try to edit "Contacts" ,"Skills" and "Portfolio" also.
Open basic.css .
You know already that , in HTML (Refer HTML - An Introduction) after html and body part , coding will start .
Refer Picture - 3 and 3(1) & Point no - 2 .
You can see that ,
- .content
- .menuwrapper
- .content.menuwrapper
- .content.mainmenu
At first ,from basic.css , use controlF (find) to find out this code.
 |
| Picture - 7 : basic.css |
All the pink colored one is the CSS code for "about us " in index.html.
A little effort needed to study this , but here , I am giving the details related to index.html file only.
Let's have a look at each one of this in detail.
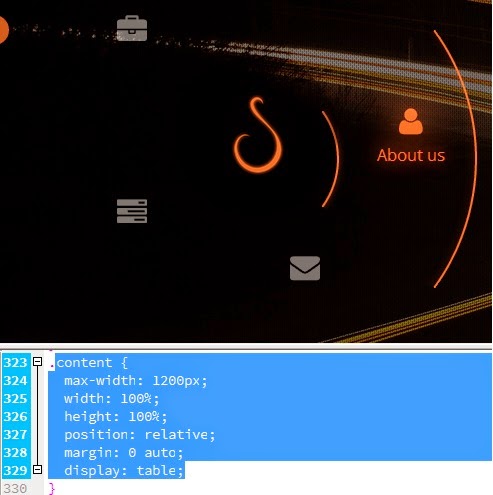
- .content
.content {
max-width: 1200px;
width:
100%;
height:
100%;
position:
relative;
margin:
0 auto;
display:
table;
}
|
In this portion , the width and height of the content (about us) is specified.
We can see that , when we open about.html file , all the texts are not in an alignment like index.html.
(See Picture - 6).
No need to tell you about the term width,height etc.But need to understand how this will change the index.html , when we change the values in about.css
Let's try .
Refer Picture - 4 . Now in the above code , I changed width 1200 to 120 .
That is , max-width: 120px;
Refer Picture - 4 . Now in the above code , I changed width 1200 to 120 .
That is , max-width: 120px;
Now save basic.css and goto index.html .
See the index.html file now.
Got an idea ?
See the index.html file now.
 |
| Compare this picture with Picture - 4 .When reduce the width from 1200 to 120 , see the text area also reduced. |
Now change it back to 1200 . then you will get Picture - 4 again.
As per the points given above , do the rest part of designing by yourself. Refer Picture - 3 and Picture 3(1) & Point no - 2 especially , to get an idea.
As per the points given above , do the rest part of designing by yourself. Refer Picture - 3 and Picture 3(1) & Point no - 2 especially , to get an idea.
Or , Will come here with the remaining part.
----------------------------------------------------------------------------------------------------------------------------
Like this , try to edit "Contacts" ,"Skills" and "Portfolio" also.
You may notice that , there is a S like symbol , and while we click that symbol in the center , we can change it.

