Now , we are moving to advanced SQL.
Click SQL-create Database & Table to go back to Basic SQL
==================================================================================
The TOP clause is used to specify the number of records to return.
The TOP clause can be very useful on large tables with thousands of records.
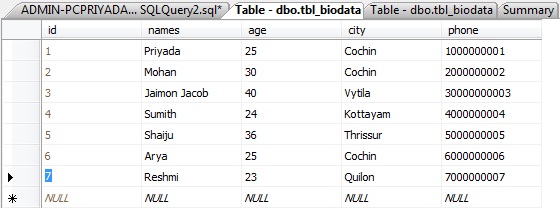
Create a Database named "Studysql" and a table named "tbl_biodata"
Right click on the database Studysql and select new query.Then we can write queries as per the requirements.
( Click here to know how created this table )
==================================================================================
Refer the above table we created.
Now we want to select only the first two records in the table above.
To do so, write the command like this in SQL.
The result-set will look like this:


Click SQL-create Database & Table to go back to Basic SQL
==================================================================================
The TOP clause is used to specify the number of records to return.
The TOP clause can be very useful on large tables with thousands of records.
The created Table is :
Create a Database named "Studysql" and a table named "tbl_biodata"
Right click on the database Studysql and select new query.Then we can write queries as per the requirements.
( Click here to know how created this table )
ID
|
NAME
|
AGE
|
CITY
|
PHONE
|
1
|
Priyada
|
25
|
Cochin
|
1000000001
|
2
|
Mohan
|
30
|
Cochin
|
2000000002
|
3
|
Jaimon Jacob
|
40
|
Vytila
|
3000000003
|
4
|
Sumith
|
24
|
Kottayam
|
4000000004
|
5
|
Shaiju
|
36
|
Thrissur
|
5000000005
|
==================================================================================
1. SQL "TOP Clause" Example
Refer the above table we created.
Now we want to select only the first two records in the table above.
To do so, write the command like this in SQL.
|
SELECT TOP 2 * FROM tbl_biodata
|
The result-set will look like this:
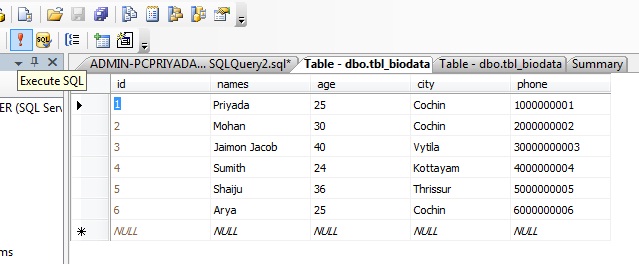
2 . SQL "TOP PERCENT" Example
Now we want to select only 50% of the records in the table we created.
To do so, write the command like this in SQL.
|
SELECT TOP 50 PERCENT * FROM tbl_biodata
|
That is , we selected 50% of the datas.Note that , we entered 6 datas in to the table.
So , the result-set will look like this:
SQL SELECT Syntax of the above table is :
SELECT TOP number|percent column_name(s)
FROM table_name
FROM table_name
NEXT CHAPTER >>
WILL CONTINUE......