Refer the below given sessions , before doing any PHP program.
PHP Introduction - And some useful points in Programming
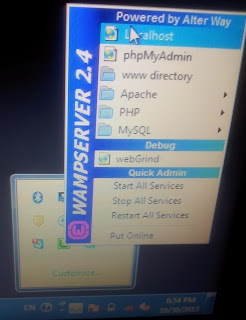
PHP : WAMP Server


<!DOCTYPE html PUBLIC "-//W3C//DTD XHTML 1.0 Transitional//EN" "http://www.w3.org/TR/xhtml1/DTD/xhtml1-transitional.dtd">
<html xmlns="http://www.w3.org/1999/xhtml">
<head>
<meta http-equiv="Content-Type" content="text/html; charset=utf-8" />
<title>Untitled Document</title>
</head>
<body>
<?php
if(isset($_POST["bt"]))
{
$connect=mysql_connect("localhost","root","")or
die("could not connect to the server");
mysql_select_db("student",$connect) or
die("could not connect to student database");
//php comment
$n=$_POST['name'];
$p=$_POST['pass'];
$q="insert into adddata values('$n','$p')";
$re=mysql_query($q,$connect);
if($re)
{
echo "Succesfully added a data";
}else
{
echo "Data could not be added";
}
die("<br><a href='home.php'>back to home</a>");
}
?>
<form action="<?php echo $_SERVER['PHP_SELF'];?>" METHOD="post">
<TABLE border=0>
<tr>
<td>Enter name</td>
<td><input type='text' name ='name'/></td>
</tr>
<tr>
<td>Password</td>
<td><input type='password' name ='pass'/></td>
</tr>
<tr>
<td colspan="2" align="center"> <input type="submit" value="Enter" name="bt"/></td>
</tr>
</TABLE>
</form>
</body>
</html>
Then , save it as .php
C : Output :


POST & GET are used to collect form-data.
PHP Introduction - And some useful points in Programming
PHP : WAMP Server
PHP-Database Connection
========================================================================
- Open wamp-->phpMyAdmin to create database .
- Open Dreamweaver to write php code , with in the body tag .That is ,
<body>.......................} php code</body> .and save it (as .php) under the www directory of wamp server. - Then click wamp-->localhost to view it in the browser.
========================================================================
The login form here given is the form only for saving the user name and password to the database.
- Open wamp-->phpMyAdmin to create database (Refer PHP : WAMP Server to know in detail)

A : Code for the form

B : Attaching code with the database..
Now we are creating the database connection through code.

Total code is A+B is ;
<html xmlns="http://www.w3.org/1999/xhtml">
<head>
<meta http-equiv="Content-Type" content="text/html; charset=utf-8" />
<title>Untitled Document</title>
</head>
<body>
<?php
if(isset($_POST["bt"]))
{
$connect=mysql_connect("localhost","root","")or
die("could not connect to the server");
mysql_select_db("student",$connect) or
die("could not connect to student database");
//php comment
$n=$_POST['name'];
$p=$_POST['pass'];
$q="insert into adddata values('$n','$p')";
$re=mysql_query($q,$connect);
if($re)
{
echo "Succesfully added a data";
}else
{
echo "Data could not be added";
}
die("<br><a href='home.php'>back to home</a>");
}
?>
<form action="<?php echo $_SERVER['PHP_SELF'];?>" METHOD="post">
<TABLE border=0>
<tr>
<td>Enter name</td>
<td><input type='text' name ='name'/></td>
</tr>
<tr>
<td>Password</td>
<td><input type='password' name ='pass'/></td>
</tr>
<tr>
<td colspan="2" align="center"> <input type="submit" value="Enter" name="bt"/></td>
</tr>
</TABLE>
</form>
</body>
</html>
(Codes in brown color is the second part(B) of the code and blue is that of A) .
Then , save it as .php
C : Output :
Save the file with the extension .php , and open if from WAMP SERVER ,
(click wamp-->localhost to view it in the browser.)

Again ,


To view the database , in which the values are stored, click WAMP-->phpMyAdmin,
Then , Select the database and table .
Note :
Both GET and POST create an array , which holds key ( names of the form controls ) OR value pairs ( input data from the user) .
Information sent from a form with the GET method is visible to everyone , through URL.
So , GET should NEVER be used for sending passwords or other sensitive information!
Information sent from a form with the POST method is invisible to others , because the variables are not displayed in the URL, it is not possible to bookmark the page.
This is the simple code, to create the form.
When the user fills out the form with username and password , and clicks the submit button, the form data is sent for processing to a PHP server.
In the above code the following is the simple html code :
===========================
<!DOCTYPE HTML>
<html>
<body>
<form action="....." method="post">
Name: <input type="text" name="name"><br>
E-mail: <input type="text" name="email"><br>
<input type="submit">
</form>
</body>
</html>
<html>
<body>
<form action="....." method="post">
Name: <input type="text" name="name"><br>
E-mail: <input type="text" name="email"><br>
<input type="submit">
</form>
</body>
</html>
===========================
This is the simple code, to create the form.
When the user fills out the form with username and password , and clicks the submit button, the form data is sent for processing to a PHP server.


